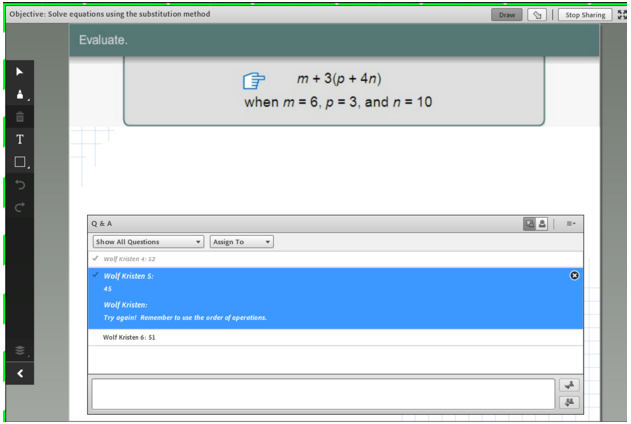
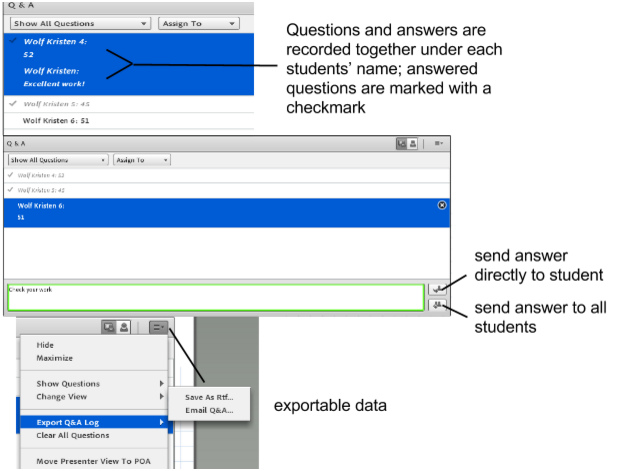
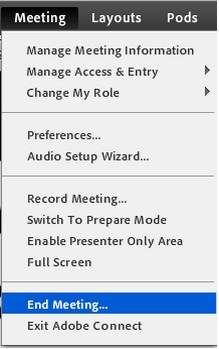
Although Adobe Connect's chat pod is sometimes good for collecting quick responses, it is difficult to give students individual feedback when using the chat pod to check for understanding. Questions and answers get disconnected too easily in the fast pace of the chat pod when several students are involved in the conversation. Instead, try using the Q&A pod in your next virtual class. Although the Q&A pod is designed for the participant to ask questions to the presenter/host, it can be used in other ways. If the teacher poses a question to students verbally or with the use of a share pod as seen below, then students can be prompted to submit their answers in a Q&A pod. With the Q&A pod, teachers have a much more streamlined record of student answers and the ability to reply directly to the student or send the question and answer out to all students. Students can get individualized feedback and carry out a private conversation with the teacher, all from within the Q&A pod. All of the responses are directly attached with the students’ answer submissions and are exportable to email. Don’t forget that you can move the Q&A pod to the Presenter Only Area when you don’t want the students to see it. For more help with the Q&A pod, contact me or visit this site.
It is important to make sure that you actually “end the meeting” when your virtual class is over. If you just close your tab or browser, without actually ended the meeting, then the session remains open. When a session remains open, it continues to send and receive data which can cause technical issues after a long period of time. Latency issues, sometimes permanent and irreparable, can and will happen to rooms left "open.” Not to mention, if your meeting is not ended then students can still enter the meeting and possible use an open pod. It is best practice to go to Meeting > End Meeting when class has concluded. You can even enter in a custom message for students to see when you end the meeting.
You can get creative with Adobe Connect by having students collaboratively fill out graphic organizers. You can search the internet for a blank graphic organizer of your choice, download it and either set it to be your meeting background (meeting>preferences>general) or insert it into the meeting with the share pod. Students can insert in their comments via chat pods placed on top of the background image or by using the text tool to draw on an image through the share pod. See the examples below for a Venn Diagram being uploaded as a background image, with chat pods placed on top and a Frayer Model uploaded in a share pod, with both chat pods and drawings on top. When complete, you can use the pod options to email the chat transcript to yourself or export a snapshot of the annotated share pod. Build these out in a separate layout so that you can make easier to see. You can even place the attendee pod in the presenter only area so that it doesn’t take up space on the student's’ view of the layout.
There are some free apps that you can add to customize your Adobe Connect meeting, such as a countdown timer or random name generator. To find and download these apps, visit http://www.adobe.com/products/adobeconnect/apps.html and select “Learn more” to download the file. Be careful because they are not all free and some just have a free trial. The app will appear as a .swf file in your Downloads folder. Now just go into your meeting and insert a share pod. Within the share pod, select “Share a document” and locate the .swf file in your Downloads to add it to the share pod. This will take a few minutes, depending on the app. Definitely test these apps out before you plan on using them with students. Instructions can be found on the Knowledge Bank site as well.
If you want your students to enter into a lobby area then you should just create a new layout from the layouts bar to serve as your lobby. Title the layout “lobby” and add any pods that you would typically see in a lobby. Have the meeting opened up a few minutes before the start time so that the students have to review the content in the lobby. It is best practice to have the daily agenda, materials, and objectives posted here, as well as a warm-up activity. You can have even have downloaded music playing via the share pod. Always do a soundcheck before switching to a new layout for the lesson. There is no separate function for creating a lobby in Adobe Connect.
To see what the students' view looks like in an Adobe Connect meeting, just make yourself a participant. Simply drag and drop your name to the participants list in the attendee pod. Alternately, you can select your name and "make participant." Switch back to host view with the same steps.
|
AuthorKristen Wolf Archives
June 2016
Categories
All
|